手写 Vue 2.0 源码(四):渲染更新原理
原文是一篇 Vue 2 源码学习系列文章,重点讲
Dep、Watcher、数组依赖收集、ob.dep.notify()、渲染 watcher 和更新流程。原文代码被抓取成了大量粘连文本,且部分实现会重复订阅、遗漏清理或直接同步渲染。本文保留核心源码思路,整理为 Vue 2.7 语境下的教学版本。
一、渲染更新的完整链路
Vue 2 的数据驱动更新可以抽象为:
读取响应式数据
  ↓
渲染 Watcher 在 Dep 中收集依赖
  ↓
数据 setter / 数组方法被调用
  ↓
Dep.notify()
  ↓
queueWatcher() 去重并进入 scheduler
  ↓
nextTick 刷新队列
  ↓
Watcher.run()
  ↓
vm._render() → 新 VNode
  ↓
vm._update() → patch
  ↓
patchVnode / updateChildren
  ↓
真实 DOM 更新
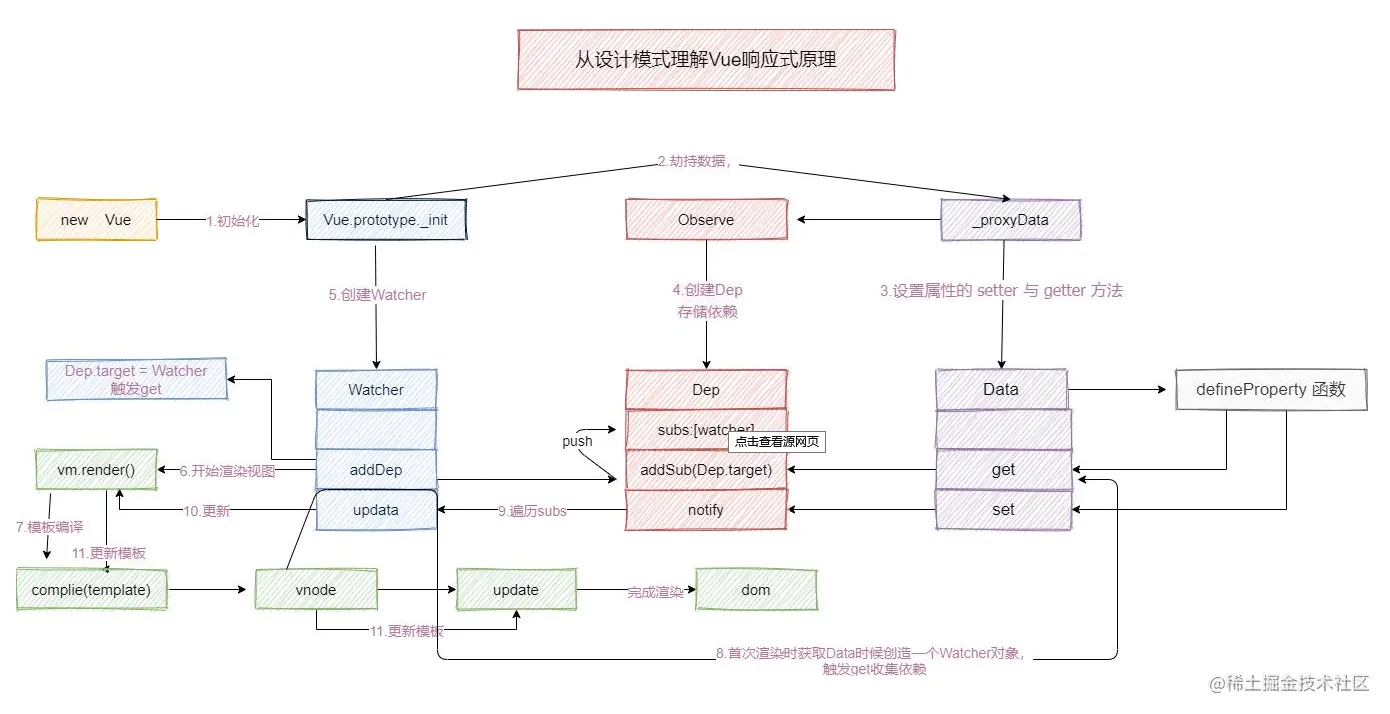
ob.dep.notify() 是数组变更和对象嵌套依赖通知中的关键入口,但它只负责“通知依赖”,不会自己完成 Diff,也不会直接等于“立即刷新整个页面”。
二、为什么需要渲染 Watcher
如果每次修改数据都要求业务代码手动调用:
vm._update(vm._render())
就失去了数据驱动的意义。Vue 2 在组件挂载时创建一个专门的渲染 watcher:
function mountComponent(vm) {
  const updateComponent = () => {
    vm._update(vm._render())
  }

  vm._watcher = new Watcher(
    vm,
    updateComponent,
    () => {},
    { isRenderWatcher: true },
  )
}
首次执行 updateComponent 时,render function 会读取模板中使用的响应式数据;getter 发现当前存在 Dep.target,就把这个渲染 watcher 收集起来。之后这些数据发生变化,依赖就能通知该 watcher。
三、Dep:保存依赖并派发通知
Vue 2 的 Dep 可以看作“一个响应式属性对应的依赖容器”:
let depUid = 0

export class Dep {
  constructor() {
    this.id = depUid++
    this.subs = []
  }

  depend() {
    if (Dep.target) {
      Dep.target.addDep(this)
    }
  }

  addSub(watcher) {
    this.subs.push(watcher)
  }

  notify() {
    // 真实 Vue 2 会把 watcher 更新交给 scheduler 去重和排序
    for (const watcher of this.subs.slice()) {
      watcher.update()
    }
  }
}

Dep.target = null
const targetStack = []

export function pushTarget(watcher) {
  targetStack.push(watcher)
  Dep.target = watcher
}

export function popTarget() {
  targetStack.pop()
  Dep.target = targetStack[targetStack.length - 1]
}
使用栈而不是简单地把 Dep.target 设为 null,是因为 computed、组件渲染和 watcher 回调可能嵌套读取响应式数据。原文中的 Dep.target = null 只能覆盖没有嵌套的极简场景。
真实源码还会在 watcher 重新求值时清理旧依赖,避免 v-if 分支变化后继续订阅已经不再使用的属性。上面的示例省略了这部分。
四、Watcher:依赖收集的桥梁
一个可运行方向更接近 Vue 2 的简化 watcher 如下:
let watcherUid = 0

export class Watcher {
  constructor(vm, getter, callback, options = {}) {
    this.vm = vm
    this.getter = getter
    this.callback = callback
    this.options = options
    this.id = watcherUid++
    this.value = undefined
    this.deps = []
    this.depIds = new Set()
    this.get()
  }

  get() {
    pushTarget(this)
    let value
    try {
      value = this.getter.call(this.vm)
    } finally {
      popTarget()
    }
    this.value = value
    return value
  }

  addDep(dep) {
    if (this.depIds.has(dep.id)) return
    this.depIds.add(dep.id)
    this.deps.push(dep)
    dep.addSub(this)
  }

  update() {
    queueWatcher(this)
  }

  run() {
    const oldValue = this.value
    const value = this.get()

    if (!Object.is(value, oldValue) || this.options.deep) {
      this.callback?.call(this.vm, value, oldValue)
    }
  }

  teardown() {
    for (const dep of this.deps) {
      const index = dep.subs.indexOf(this)
      if (index >= 0) dep.subs.splice(index, 1)
    }
    this.deps.length = 0
    this.depIds.clear()
  }
}
这里的 get() 会在调用 render function 前压入当前 watcher,render 读取数据时触发 getter,getter 再调用 dep.depend()。watcher 和 dep 是多对多关系:一个 watcher 可能读取多个属性,一个属性也可能被渲染 watcher、computed watcher 和 user watcher 同时使用。
真正的 Vue 2 watcher 还支持:
- 字符串路径和函数 getter;
- lazy computed watcher;
- user watcher、deep watcher、sync watcher;
- 依赖清理和 before hook;
- 更新队列、排序、错误处理。
五、defineReactive:对象属性的依赖收集
export function defineReactive(object, key, initialValue) {
  let value = initialValue
  let childOb = observe(value)
  const dep = new Dep()

  Object.defineProperty(object, key, {
    enumerable: true,
    configurable: true,

    get() {
      if (Dep.target) {
        dep.depend()

        if (childOb) {
          childOb.dep.depend()
          if (Array.isArray(value)) {
            dependArray(value)
          }
        }
      }
      return value
    },

    set(nextValue) {
      if (Object.is(nextValue, value)) return
      value = nextValue
      childOb = observe(nextValue)
      dep.notify()
    },
  })
}
为什么 getter 中除了属性自己的 dep.depend(),还要调用 childOb.dep.depend()?
const state = { list: [1, 2, 3] }
读取 state.list 时会触发 list 属性的 getter,但调用 state.list.push(4) 时,真正被改写的是数组方法。数组需要自己的 Observer dep,才能在方法执行后调用 ob.dep.notify() 通知读取过这个数组的渲染 watcher。
1. 观察对象
function observe(value) {
  if (!value || typeof value !== 'object') return undefined
  if (value.__ob__) return value.__ob__
  return new Observer(value)
}

class Observer {
  constructor(value) {
    this.value = value
    this.dep = new Dep()

    Object.defineProperty(value, '__ob__', {
      value: this,
      enumerable: false,
      configurable: true,
    })

    if (Array.isArray(value)) {
      augmentArray(value)
      this.observeArray(value)
    } else {
      this.walk(value)
    }
  }

  walk(object) {
    for (const key of Object.keys(object)) {
      defineReactive(object, key, object[key])
    }
  }

  observeArray(items) {
    for (const item of items) observe(item)
  }
}
Vue 2 实际上还要处理不可扩展对象、SSR、数组原型兼容、观察过的对象复用以及 Vue.set/Vue.delete。这段代码只展示数据结构。
2. 递归收集嵌套数组依赖
如果数组里还有数组,仅观察它们还不够;只有读取时触发依赖收集,外层渲染 watcher 才会订阅内层数组的 Observer dep:
function dependArray(array) {
  for (const item of array) {
    if (item && item.__ob__) {
      item.__ob__.dep.depend()
    }
    if (Array.isArray(item)) {
      dependArray(item)
    }
  }
}
“递归观测”和“递归收集依赖”是两个阶段:前者让属性具备 getter/setter,后者把当前 watcher 加入实际会影响当前渲染的依赖集合。
六、数组如何派发更新
Object.defineProperty 无法通过为已存在的数组索引自动覆盖所有数组操作,因此 Vue 2 改写了七种变更方法:
push、pop、shift、unshift、splice、sort、reverse
简化实现:
const arrayProto = Array.prototype
const methodsToPatch = [
  'push', 'pop', 'shift', 'unshift', 'splice', 'sort', 'reverse',
]
const arrayMethods = Object.create(arrayProto)

for (const method of methodsToPatch) {
  const original = arrayProto[method]

  Object.defineProperty(arrayMethods, method, {
    value(...args) {
      const result = original.apply(this, args)
      const ob = this.__ob__
      let inserted

      if (method === 'push' || method === 'unshift') {
        inserted = args
      } else if (method === 'splice') {
        inserted = args.slice(2)
      }

      if (inserted) ob?.observeArray(inserted)
      ob?.dep.notify()
      return result
    },
    enumerable: false,
    writable: true,
    configurable: true,
  })
}

function augmentArray(array) {
  Object.setPrototypeOf(array, arrayMethods)
}
原文的核心 ob.dep.notify() 是正确方向,但需注意:
- Vue 2 能检测这些变更方法,不代表能检测任意数组索引赋值;
arr[index] = value应用$set/Vue.set或splice;arr.length = 0在 Vue 2 中也不能像 Proxy 一样被完整捕获;- 新增的对象项要调用
observe,否则其嵌套属性不会被转换; - 通知后还要经过 scheduler 去重,不是每个数组 trap 都立即重渲染。
七、渲染 watcher 的更新队列
如果 Dep.notify() 直接调用每个 watcher 的 get(),同一事件中的多次赋值会重复渲染。Vue 2 使用 scheduler:
const queue = []
const has = new Set()
let waiting = false

function queueWatcher(watcher) {
  if (has.has(watcher.id)) return
  has.add(watcher.id)
  queue.push(watcher)

  if (!waiting) {
    waiting = true
    nextTick(flushSchedulerQueue)
  }
}

function flushSchedulerQueue() {
  // 真实 Vue 2 会按 watcher.id 排序,并处理 activated/updated 等钩子
  for (const watcher of queue.slice()) {
    watcher.run()
  }

  queue.length = 0
  has.clear()
  waiting = false
}

function nextTick(callback) {
  Promise.resolve().then(callback)
}
Vue 2 的 nextTick 会根据环境使用 Promise、MutationObserver、setImmediate 或 setTimeout 等回退策略;上面的 Promise 版本只适用于支持 Promise 的现代环境。调度器还需要处理 watcher 在 flush 期间新增、循环更新、错误捕获和生命周期顺序。

八、_render、_update 和 patch
渲染 watcher 触发时,流程可以简化为:
const updateComponent = () => {
  const vnode = vm._render()
  vm._update(vnode)
}
首次渲染时,vm._vnode 为空,patch 的 old value 是真实挂载元素;后续更新时,old value 是上一次生成的 VNode:
Vue.prototype._update = function (vnode) {
  const oldVnode = this._vnode
  this._vnode = vnode

  if (!oldVnode) {
    this.$el = this.__patch__(this.$el, vnode)
  } else {
    this.$el = this.__patch__(oldVnode, vnode)
  }
}
1. sameVnode
原文把 Vue 2 的 sameVnode 简化为“key 和 selector 相同”。实际判断还会考虑注释标记、data 是否存在、输入类型等条件;教学版可以写成:
function sameVnode(a, b) {
  return a.key === b.key
    && a.tag === b.tag
    && a.isComment === b.isComment
    && Boolean(a.data) === Boolean(b.data)
}
节点类型不同或 key 不同,通常会销毁旧节点并创建新节点;同一节点才进入 props、文本和 children 的 patch。
2. patchVnode
function patchVnode(oldVnode, vnode) {
  if (oldVnode === vnode) return

  vnode.elm = oldVnode.elm

  if (vnode.text != null && vnode.children == null) {
    if (vnode.text !== oldVnode.text) {
      vnode.elm.textContent = vnode.text
    }
    return
  }

  patchProps(oldVnode.elm, oldVnode.data, vnode.data)
  updateChildren(
    oldVnode.elm,
    oldVnode.children || [],
    vnode.children || [],
  )
}
真实 Vue 2 需要区分新旧文本、子节点、新增/删除属性、组件 hooks、指令 hooks、Transition 和 input property。这里的重点是“复用旧 elm,只更新变化部分”。
九、Vue 2 双端 children Diff
Vue 2 的 updateChildren 使用四个指针:
oldStartIdx、oldEndIdx
newStartIdx、newEndIdx
典型匹配顺序:
- 旧头与新头;
- 旧尾与新尾;
- 旧头与新尾;
- 旧尾与新头;
- 都不匹配时建立 key → 旧节点索引的 map。
伪代码:
function updateChildren(parentElm, oldCh, newCh) {
  let oldStart = 0
  let oldEnd = oldCh.length - 1
  let newStart = 0
  let newEnd = newCh.length - 1

  while (oldStart <= oldEnd && newStart <= newEnd) {
    const oldStartVnode = oldCh[oldStart]
    const oldEndVnode = oldCh[oldEnd]
    const newStartVnode = newCh[newStart]
    const newEndVnode = newCh[newEnd]

    if (sameVnode(oldStartVnode, newStartVnode)) {
      patchVnode(oldStartVnode, newStartVnode)
      oldStart++
      newStart++
    } else if (sameVnode(oldEndVnode, newEndVnode)) {
      patchVnode(oldEndVnode, newEndVnode)
      oldEnd--
      newEnd--
    } else if (sameVnode(oldStartVnode, newEndVnode)) {
      patchVnode(oldStartVnode, newEndVnode)
      parentElm.insertBefore(
        oldStartVnode.elm,
        oldEndVnode.elm.nextSibling,
      )
      oldStart++
      newEnd--
    } else if (sameVnode(oldEndVnode, newStartVnode)) {
      patchVnode(oldEndVnode, newStartVnode)
      parentElm.insertBefore(oldEndVnode.elm, oldStartVnode.elm)
      oldEnd--
      newStart++
    } else {
      // 通过 key map 查找、复用并移动旧节点;找不到则创建新节点
      break
    }
  }

  // 处理剩余的新节点或旧节点
}
双端比较只是 Vue 2 的一种启发式策略,不保证任意树变化都达到理论最优;key 仍然是表达列表身份的关键。Vue 3 使用了不同的 renderer、block tree、Patch Flags 和 keyed children 策略,不能把 Vue 2 的函数名直接套到 Vue 3。
十、从 Vue 2 视角看 Vue 3
| 方面 | Vue 2.7 | Vue 3.5 |
|---|---|---|
| 响应式 | defineProperty、Dep、Watcher | Proxy、ReactiveEffect、scheduler |
| 渲染更新 | render watcher | 组件 render effect 和 job queue |
| 数组 | 改写七种变更方法 | Proxy + 数组/集合 instrumentation |
| 编译优化 | 静态节点标记等 | 静态提升、Patch Flags、Block Tree |
| 组件根节点 | 默认单根 | 支持 Fragment 多根 |
| 内部 API | _render、_update 等历史实现 | createVNode、renderer 等模块化实现 |
Vue 3 仍然有“依赖变化 → 重新生成 VNode → patch”的主线,但它不使用 Vue 2 那种公开可观察的渲染 watcher 类。学习本文时要明确版本边界:这是为了理解 Vue 2 源码,而不是给 Vue 3 项目编写内部插件。
总结
- getter 负责依赖收集,setter/数组方法负责通知;
Dep保存 watcher,Watcher连接响应式数据和渲染函数;- 数组需要 Observer dep、
dependArray和七种方法改写; ob.dep.notify()只是派发更新,实际渲染要经过 scheduler、render 和 patch;- Vue 2 的更新使用渲染 watcher 和双端 Diff;
- Vue 3 使用 Proxy/effect、编译提示和新的 renderer,源码模型不能直接混用。
参考资料
原文作者:前端鲨鱼哥。原文关于 Vue 2 渲染 watcher、Dep、数组依赖、ob.dep.notify()、scheduler 和 patch 更新的主线予以保留;文章目录错序、粘连代码、重复条件、数组方法缺少边界处理和 Vue 2/3 混用表述已整理或修正。